Chapter 18: Pebble User Interface Development
The user interface (UI) of an application is perhaps the most important part of a Pebble smartwatch app. Your code can be perfectly accurate in what it does, but if it has a poor UI, it will likely be difficult to use. The designers at Pebble have spent a lot of time and intellectual energy designing methods and guildelines that will help you make a great UI for your application.
This chapter will outline the concepts used to develop user interfaces for smartwatch applications. We will focus on three areas: windows, layers, and buttons. This chapter is by no means meant to be a final definition of UI development; Pebble has an extensive set of developer guildelines for that. Rather, our purpose here is to review the foundational UI elements, to place these elements in perspective and to provide some examples in C that will allow you to get familiar using these elements for UI development. As always, we will provide some exercises for you to practice your UI skills.
After reading the material here, make sure you consult the Pebble guides as well. Documentation links for these can be found at the end of the chapter.
Basic UI Components
Two basic components of a Pebble smartwatch user interface are windows and layers.
Windows
A window is an area where user interaction, both input and output, takes place. A window is the focus of UI for a given moment in time. Windows always fill the screen and every app has at least one window.
Windows represent the system's interaction with the user: they manage button clicks, have background and foreground colors, and can store data for use at a later time.
Let's consider a simple program, the "Hello" program from chapter 2 and the Pebble tutorial.
#include <pebble.h>

Window *window;
TextLayer *text_layer;

void init() {
  window = window_create();
  text_layer = text_layer_create(GRect(0, 0, 144, 40));
  text_layer_set_text(text_layer, "Hello, Pebble!");
  layer_add_child(window_get_root_layer(window),
                text_layer_get_layer(text_layer));
  window_stack_push(window, true);
}

void deinit() {
  text_layer_destroy(text_layer);
  window_destroy(window);
}

int main() {
  init();
  app_event_loop();
  deinit();
  return 0;
}
In the code above, notice the way the main window is used. The code initializes the UI in the function init(), creating a window assigned to the variable window by calling window_create(). The window is created, used to hold a text layer, and put to use by pushing it onto the window stack (more on this below). When the program terminates, it calls deinit() which destroys the main window through a call to window_destroy(). This pattern of creation/usage/destruction is how windows are used in all Pebble smartwatch apps.
An application can have multiple windows. Consider an application that allows a user to choose a barcode from a list, then displays that barcode. This application could be designed around two windows: one that interacts with the user through a barcode list and one that interacts by displaying a barcode image. Each window reacts to user actions differently: the list might use "up" and "down" buttons to navigate the list and "select" to choose the barcode while the barcode display might only respond to a "back" button press. Each window could also have other UI elements: the list window might have an action bar across the top while the image display would have just the barcode displayed. Because there are several display uses and interactions that are different, windows become a package of sorts that wrap these different type of uses.
At any point in an application, only one window is responsible for interacting with the user. Multiple windows are organized into the window stack; the window at the top of the stack is the one responsible for interacting with the user. The act of pushing the window causes the pushed window to be displayed and used for the UI. Only windows on the stack will be part of the UI.
Even if there is only one window, it must be on the stack. In the example code above, notice that, after the window is created, it is pushed onto the application's window stack via a call to window_stack_push(). The first parameter is the window being pushed; the second parameter dictates if the window is introduced to the smartwatch screen with sliding animation.
Windows can be pushed and popped from the window stack. Think about the barcode app example. Once the barcode is chosen, it is displayed by creating a second window, pushed on top of the first, that holds the barcode image. This window is popped when the user is done with the image. After the popping of the image window, the underlying window, the one displaying the list, is redisplayed because it is then on top of the stack.
Layers
A layer is display device. It displays graphical components.
There are several "graphical components" that can be displayed in a layer. Each graphical component has its own type of layer. Here is a short list:
- Text layers display textual components. These obviously include letters and words, but these letters and words have specific properties, like sizes, colors, and fonts.
- Bitmap layers display bitmap images. Bitmap images have attributes that include image data (naturally), alignment within a layer, background color, and rendering properties. There is also a type of layer that will automatically rotate an image.
- Menu layers display list-based menus. There are also simple menu layers that have very few configurable properties.
- Scroll layers can wrap other content and supply a scroll bar with scrolling action.
- Status bars, with data displayed at the top of a screen, and action bars, with control data displayed on the right of the screen, are displayed in their own layers.
As an example, consider the example code from the previous section. In the init() function, after the main window is created, a text layer is created with a call to text_layer_create(). That create function needs the dimensions that are applied to the newly created layer. Layers have dimensions that do not have to match those of the window they are part of. In the example above, the text layer is created to be the width of the screen, but only with a height of 40 pixels. Layers also have a specific location within the window in which they are created. In the example above, the text layer starts at the coordinates (0,0).
Once created, layers must be attached to windows. In the code above, the layer is added to the application's main window with a call to layer_add_child(). When added to a window, a layer becomes a "child" of the window. These hierarchies are discussed in detail in the next section.
It's easy to imagine that a window could have multiple layers. In fact, there is a rich set of tools available for manipulating layers within a window. A single window could have text, a menu, a status bar, and an image. Each of these components would have their own layers: a text layer, a menu layer, and so forth. Layers obscure or show other layers; layers can be displayed or hidden. This set of tools is designed for maximum flexibility.
When an application is done using a layer, that layer should be destroyed. We destroy the text layer in the above example with a call to text_layer_destroy() in the deinit() function.
Consider the barcode app example. We saw that there could be two windows for this example. The first window, displaying the barcode list, has a menu layer that contains the list and a text layer that displays a "wait" message. These are created and added as children to the barcode list window. The second window that displays the barcode in a bitmap layer, created and added as a child.
There are times when a layer must be updated. Updating a layer can mean a number of things: redrawing the layer, refreshing the text in a layer, or rewriting a menu. Updating a layer happens in a number of circumstances; these circumstances can be automatic (updating by the system) or "manual" (layers can be forced to redraw when marked as "dirty"). By default, updating done by a system function; this function can be overridden by using layer_set_update_proc(). Using this update function is a common way to manage the contents of a layer.
Hierarchies and Roots
As we just discussed, an application can have multiple windows and multiple layers in those multiple windows. Together, these windows and layers form a sort of "family tree" of UI elements.
In this hierarchy, there is a root window. Each application must have at least one window; this first window becomes the root of the window stack. Other windows, when created, are displayed by being pushed onto the window stack; the root window is the first, and is last one to be popped from the stack.
Visual, graphic components are usually displayed in the window that fills a smartwatch screen. Therefore, in each window, there is a at least one layer, the root layer for that window.
Unlike the window hierarchy, each layer in a window can have siblings and multiple layers could be displayed on the screen at the same time.
The layer hierarchy is especially useful when determining which layers need updating. When other layers in the hierarchy request a redraw, when the parent window is shown or hidden, when the layer heirarchy changes, or some kind of object is drawn over a layer all cause layer updates.
Event Programming and UI Interaction
User interfaces are based on the event-driven programming model we introduced in Chapter 11. Event-driven programming uses a pattern that looks like this:
- Set up the user interface through an initial set of function calls.
- Register UI events with the operating system along with the callbacks that will be called when the registered events occur.
- Wait.
- Respond to user events by allowing the operating system to call callback functions.
- Tear down the user interface, freeing up memory, when the app terminates.
Let's reexamine the basic loop from the example main function definition:
int main() {
  init();
  app_event_loop();
  deinit();
  return 0;
}
Here is the UI event pattern in a nutshell: setup the interface by calling init(), wait and respond to events by calling app_event_loop(), tear down the app by calling deinit().
As we design event-response functions, we need to remember that there are both user-initiated and software- or system-initiated events. Here are some examples:
- The user presses one of the watch buttons (user-initiated).
- A layer is set to "dirty" (system-initiated).
- A tap event is sensed when the user flicks her wrist (user-initiated).
- A menu is drawn on the display (system-initiated).
In addition, certain software UI elements define their own reaction to events. For example, in the barcode app, we create a barcode list in a menu layer. By doing so, we don't have to react to "up" and "down" buttons as these are automtically programmed into the menu layer. Other examples are UI elements: each one has their own unique reaction to UI events. See the Pebble documentation on "Example Implementations" for examples of UI elements with built-in reactions.
Using the Click Interface
One set of UI events that can be under programmer control is the set of button presses. This set of events is an excellent example of event-driven programming. A button press is defined as a "click" for the Pebble smartwatch UI.
There are several types of clicks in the Pebble smartwatch UI. First, there are single clicks and multiple clicks. A single click is a single press/release sequence on a smartwatch button. A multiple click is a rapid sequence of single clicks: double and even triple clicks are recognized. Secondly, the UI recognizes long clicks: longer press/hold/release sequences. Finally, there are "raw" events: events that are not combined into higher level events. For example, a single click is composed of two raw events: a button press and a button release.
Windows register with the operating system to receive and process click events. Each window has a click config provider, that is, a function that configures which click events are valid and which callbacks are used to respond to click events. The function window_set_click_config_provider() sets up the provider for a window. For example, to set the function configure_clicks() as the click config provider for a window called window, you would make the following call:
window_set_click_config_provider(window, (ClickConfigProvider) configure_clicks);
This potentially needs to be done for each window in an interface. However, if a window does not need to pay attention to buttons, then no click config provider needs to be set.
The click config provider is called every time the window is made visible; this usually occurs when a window is pushed onto the stack or windows above it in the stack are popped off. This click config provider is then responsibile for setting up the clicks that will be used and the callbacks that will respond to click events.
Consider our barcode example. Let's say that we want the "up" and "down" buttons to switch between barcode renderings from the menu that was displayed. We would set up the window with call like we described above:
window_set_click_config_provider(window, click_config_provider);
The click_config_provider function could determine how many barcodes could be displayed and use that in its subscription of click events:
static void click_config_provider(void *context) {
  if (num_barcodes > 1) {
     window_single_click_subscribe(BUTTON_ID_UP, display_previous_barcode);
     window_single_click_subscribe(BUTTON_ID_DOWN, display_next_barcode);
  }
}
Here, we subscribe to click events only if there are more than one barcode, as there is no need to display other barcodes if there is only one. Also note that the "select" button is really not needed, so we don't subscribe to "select" button presses.
Finally, note that the click_config_provider function does need to be called each time the window is pushed onto the window stack. The number of barcodes is likely to change from one rendering to the next time a rendering is needed and the click_config_provider() function needs to be called to resubscribe to click events as needed.
There are other ways to set up click responder callbacks. For example, the menu layer has the function menu_layer_set_callbacks() that can set all the callbacks for several different events for a menu layer. In the barcode example, the menu layer callbacks are set with this call:
menu_layer_set_callbacks(mainMenu, NULL, (MenuLayerCallbacks){
    .get_num_sections = mainMenu_get_num_sections,
    .get_num_rows = mainMenu_get_num_rows_in_section,
    .get_header_height = mainMenu_get_header_height,
    .draw_header = mainMenu_draw_header,
    .draw_row = mainMenu_draw_row,
    .select_click = mainMenu_select_click,
    .select_long_click = mainMenu_select_long_click,
});
The MenuLayerCallbacks struct is initialized and set with this call. Several components of drawing a menu as well as click response callbacks are set here. Menu layers and scroll layers set callbacks this way; action bars, menu layers, and scroll layers also allow you set up click config providers in alternative ways.
When click event callbacks are registered and events are subscribed to, we need to include the actual callback functions that respond to button clicks. For example, to display the previous barcode, we might register a function that starts like this:
static void display_previous_barcode(ClickRecognizerRef recognizer, void *context) {
    ...
}
The first parameter in the click handler is a ClickRecognizerRef. This is a reference to the system handler that recognized the click and called the click handler.
Note the context parameters in both the click config provider and the click event handler. It is described in the parameter list as a void parameter; "void" is the C way of describing "unspecified". It can be set to specialized data that accompanies the callback call. By default, it is set to the window that is displayed when the subscribed button is clicked. You can extract the window from the default value of this parameter like this:
Window *window = (Window *)context;
You can set the data sent to a callback several ways. You can set all click events that are subscribed from a specific window with one call, an alternate to window_set_click_config_provider():
void window_set_click_config_provider_with_context(Window * window,
                       ClickConfigProvider click_config_provider,
                       void * context);
You can also set a specific button's context data with a call to window_set_click_context():
void window_set_click_context(ButtonId button_id, void * context);
Let's consider the barcode example again. To display a barcode, the app must request barcode data from the phone connected to the smartwatch and it must know the position number of the barcode in the barcode list. That position could be made known to the function that displays the barcode by making the context point to the position number. Using this, the function that displays the barcode could use a parameter instead of a global variable.
To subscribe to multiclick events, the process is the same as with single-click events, but now we must define what "multiclick" means. Here is the prototype of the subscription call:
void window_multi_click_subscribe(ButtonId button_id,
                                  uint8_t min_clicks, uint8_t max_clicks, uint16_t timeout,
                                  bool last_click_only,
                                  ClickHandler handler)
Here, we are telling the system to use handler as the handler for multiclicks to the button_id button. We define multiclicks to this function as any number of clicks from min_clicks to max_clicks that fall into the time block defined by timeout. Handlers for all multiclicks detected will be called unless last_click_only is true; when it is true, only the handler for the last multiclick sequence will be used. Zero values for max_clicks and timeout indicate default values: min_clicks for max_clicks and 300ms for timeout.
Let's say we want to implement a "redraw" of a barcode image, connected to the "select" button. We don't want to use a single-click, in case that's used by accident, because it's a lot of data to retreive from the phone by accident. So we want a triple-click to cause a redraw. We might use the following call to register this:
window_multi_click_subscribe(BUTTON_ID_SELECT, 3, 0, 0, true, redraw_bitmap);
This subscribes to clicks with a "select" button handler called redraw_bitmap, called when we have a minimum of 3 and a maximum of 3 clicks in a 300ms window.
To manage repeating clicks, we use a subscription function that defines the time interval for a button press to be considered a repeat. Here is the prototype:
window_single_repeating_click_subscribe(ButtonId button_id,
                                        uint16_t repeat_interval_ms, ClickHandler handler)
Here, we are saying that any button press that is longer than repeat_interval_ms is considered a repeat button press. The system default value for this configuration parameter is 30ms.
Let's say that we want a long period of time for considering a button press. This would be useful if the user of our app had difficulty using her hands or might take longer to press a button. (For example, older users of a Pebble smartwatch might need longer time to perform button presses.) We might extend the 30ms repeat interval with this call:
window_single_repeating_click_subscribe(BUTTON_ID_SELECT, 750, select_button_handler);
This call defines repeat clicks as those for which the "select" button is pressed for longer than three-quarters of a second. This might help certain users with button presses.
Like repeating clicks, long clicks need a time interval for a definition. Since long clicks are defined by holding a button for a long interval, handling a press event differently from a release event might be useful. All of this information can be given in the subscription call; here is the prototype:
void window_long_click_subscribe(ButtonId button_id,
                                 uint16_t delay_ms,
                                 ClickHandler down_handler, ClickHandler up_handler)
This call defines a long click as an event that happens when a button is held for delay_ms milliseconds. When the button_id is pressed, the down_handler is called and when the button_id is released, the up_handler is called. Either handler can be specified as NULL to indicate that there is no handler.
Raw click data can be subscribed to as well. However, there is no abstraction into long clicks or multiclicks; you just get the actual button presses. Like the long click, you get the press and the release. Here's the prototype:
void window_raw_click_subscribe(ButtonId button_id,
                                ClickHandler down_handler, ClickHandler up_handler,
                                void * context)
As with the long click, you can specify a function to call for a button press and a button release. Here, however, you also have the opportunity of supplying a context variable.
Finally, you can get information about clicks. You can call functions to get the number of clicks (click_number_of_clicks_counted()), the actual button ID that triggered a callback (click_recognizer_get_button_id()), and whether the event being handled is a repeating click (click_recognizer_is_repeating()). Each of these is especially helpful when a number of events is handled by the same handler.
The Back Button
Using the back button produces a special event. Although it's "just" a button, like the others, it has special duties. It's primary function is to pop windows from the window stack (and terminating the app if the last window is the root window). Both
window_single_click_subscribe()andwindow_multi_click_subscribe()can modify the back button's behavior, but a long press will always terminate the app and return to the main menu. This means other subscriptions are not possible.
An Example: Displaying Barcodes on a Pebble Smartwatch
Let's tie this chapter together by looking at an example. We have looked at a barcode display app in this chapter and this would be a good application to consider as an example of user interaction. You can find the source code for this app here and the source code for the Android companion app here.
We will look at the UI elements of this app here. We will ignore the communication components, but we will cover those in Chapter 20.
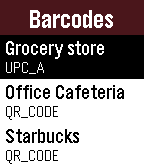
Let's start with design. As we mentioned previously, we need two separate interface areas: one to display a menu of barcodes and one to display the barcode selected from the list. This can be accomplished best with two windows: one for menu interactions, with buttons used for navigating and selecting menu items, and one for a bitmap image display. The menu window would be like that shown in Figure 18.1: it has a title and a list of barcodes.
When a menu item is selected, we create and push the barcode display window. The app needs to display "please wait" text like that in Figure 18.2 asking the use to wait while the barcode image loads. This means that the barcode window needs two layers: one to display the barcode (an instance of BitmapLayer) and one to display the wait message (and instance of TextLayer). An example bitmap display is shown in Figure 18.3.


Let's focus on user interaction. Most of the button clicks we need to manage the screen are built into the layers we will use to manage the screen display. The menu layer is declared as a MenuLayer, which manages "up" and "down" buttons for list navigation. We will want to install code to manage the selection of a menu item (barcode) using the "select" button. The code also manages a long click of the "select" button; this will refresh the smartwatch screen by loading the barcode list from the phone app. The only user interaction from the barcode display window is go back using the "back" button; other button presses are ignored.
Let's look at the main function in the watchapp.
int main(void) {

    state = STATE_NONE;

     window = window_create();
     window_set_window_handlers(window, (WindowHandlers) {
        .load = window_load,
        .unload = window_unload,
    });
    window_stack_push(window, true);

     app_event_loop();

    window_destroy(window);
}
Here, we set the communication state (via the state variable), create the main menu window, set the main window's handlers (via load and unload callbacks) and push the main window onto the window stack. This causes this window to be displayed; it's an empty window until the menu layer is activated and the layer's callbacks are called. Then we wait for window events with app_event_loop(). When the app terminates, the app_event_loop() function returns and the main window is destroyed as the app exits.
The barcode list window loads when the main window is created and displayed on the watch screen. This happens when the function window_load() is called. Let's look at the UI part of its code:
static void window_load(Window *window) {
     Layer *window_layer = window_get_root_layer(window);
     GRect bounds = layer_get_frame(window_layer);

     mainMenu = menu_layer_create(bounds);

     // Set all of our callbacks.
     menu_layer_set_callbacks(mainMenu, NULL, (MenuLayerCallbacks){
          .get_num_sections = mainMenu_get_num_sections,
          .get_num_rows = mainMenu_get_num_rows_in_section,
            .get_header_height = mainMenu_get_header_height,
          .draw_header = mainMenu_draw_header,
          .draw_row = mainMenu_draw_row,
          .select_click = mainMenu_select_click,
          .select_long_click = mainMenu_select_long_click,
     });

     // Bind the menu layer's click config provider to the window for interactivity
     menu_layer_set_click_config_onto_window(mainMenu, window);

     // Add it to the window for display
     layer_add_child(window_layer, menu_layer_get_layer(mainMenu));

     barcode_window = window_create();
     window_set_window_handlers(barcode_window, (WindowHandlers) {
         .load = barcode_window_load,
         .unload = barcode_window_unload,
     });
 }
In this code, we get the bounds (height, width, and coordinates) of the root window and create the menu layer so that it completely fills the root window. The menu layer is very configurable, and we then configure the menu layer to call various functions when it needs information, when drawing must be done, or when the select button is clicked. We then merge the window's click handler with the menu layer's and we add the menu layer as a child of the root window's root layer with layer_add_child(). Finally, we create the barcode window and configure the functions to call when the barcode window is loaded.
Completely examining all the app code is not feasible here, but let's look at the code that selects a menu item. This will walk us through pushing a new window and creating the image layer.
According to the code above, the following code is executed when the "select" button is pressed in the menu window.
static void mainMenu_select_click(MenuLayer *menu_layer, MenuIndex *cell_index, void *data)
{
    if (barcodeNameCount == 0) {
        state = STATE_NONE;
    } else {
        window_stack_push(barcode_window, true /* Animated */);

        state = STATE_RECEIVING_BARCODE;
        send_request(SEND_BARCODE, cell_index->row);
        justSelected = cell_index->row;
    }
}
The parameters to the function relay the menu layer that was displayed when the button was pressed (unnecessary in our case, since there is only one menu layer), the index (from 0) of the item selected, and any item-specific data that was attached to the item (none for our example). We consider how many barcode names we have; if none, we reset our communication state and do nothing else, because there is nothing to display for selection. If our barcode count is non-zero, we push the barcode window (remember, it has already been created in the initialization phase) and start the image receiving process. Pushing the barcode window means that it will be displayed and it's window load handler will be called. That code is below:
static void barcode_window_load(Window *window) {
    Layer *window_layer = window_get_root_layer(window);
    GRect bounds = layer_get_frame(window_layer);

    barcodeImageData = (uint8_t *)malloc(BYTES_PER_SCREEN);
    memset(barcodeImageData, -1, BYTES_PER_SCREEN);

    pleaseWait = text_layer_create(GRect(0,65,bounds.size.w,140));
    text_layer_set_text_alignment(pleaseWait, GTextAlignmentCenter);
    text_layer_set_font(pleaseWait, fonts_get_system_font(FONT_KEY_GOTHIC_28_BOLD));
    text_layer_set_text(pleaseWait, "Please wait...");
    layer_add_child(window_layer, text_layer_get_layer(pleaseWait));
    layer_set_hidden(text_layer_get_layer(pleaseWait), true);

    barcodeImageLayer = bitmap_layer_create(GRect(0,0,bounds.size.w,bounds.size.h));
    layer_set_update_proc(bitmap_layer_get_layer(barcodeImageLayer), bitmap_layer_update_callback);
    layer_add_child(window_layer, bitmap_layer_get_layer(barcodeImageLayer));
}
Here, we create two layers. The first contains our "please wait" message, created to be located at the coordinates (0,65). The second is the barcode display layer. We create this layer as big as the bitmap window so that it completely fills that bitmap window. For this bitmap layer, we create a memory area, meant to hold the image transmitted from the phone, and we register a function to call when the bitmap layer needs updating. We add both layers to the root layer of the bitmap window, but we set the text window to be hidden until we need it.
This type of interaction is typical. Click handlers are called for button presses; these handlers manipulate layers that are children of windows. Layers are also managed by handlers that draw in them or fill them with image bits.
There is some user interaction that is already implemented for certain windows and layers. We already saw that menu navigation is built into the menu layer; we merged the root windows button management with the menu layer's management. The behavior of the "back" button is also built into each window; the default behavior is to unload the current window, which means calling the window's unload handler.
Designing Excellent UI Interfaces
There are many sources of information on how to design and implement an excellent user interface. Pebble itself has an extensive set of documentation on how to build a user interface for a smartwatch (there are refereces in the next section). There are four principles we should review here; each of these are amplified by the Pebble documentation.
- Keep it simple. The best user interface designs are simple designs. They don't stand out; they don't get in the way. In fact, they are almost invisible.
- Keep it consistent. Use UI elements consistently. Don't use non-standard elements. Consistent use of familar elements puts users at ease and allows patterns to emerge in interface use. Patterns will grow into habits, which make interfaces feel invisible and create skills that are transferrable to other parts of the app.
- Keep it intentional. Always be purposeful in the layout of windows and layers. Be strategic in the use of interface elements such as fonts, colors, and messages.
- Keep it communicating. Your app should brim with information, always informing the user about actions, changes, and errors.
Applications that build interfaces that follow these rules are easily used and feel familiar even when they haven't been used in a while. Take some time to review the Pebble UI design guidelines to get some feeling for how these principles apply to smartwatch interface design.
Documentation
As we stated at the beginning of this chapter, the discussion here is not meant to be the definitive guide to writing user interfaces. Rather, we have discussed the basics in detail: windows, layers, and clicks. There are excellent documents that describe other components of user interfaces and detail user interface design principles and guidelines. The links below will help you build on the concepts we have discussed in this chapters.
- There are other components of user interfaces that we have not discussed here. These include animation, vibration (and the material presented in Chapter 14), and the backlight.
- Configuration and settings play a role in how users interact with apps. A guide to app configuration can be found here.
- There is a guide to user interface design here, including a great discussion of UI design principles, here.
- Guidelines to how to build user interface components, including some of the material we have discussed in this chapter, can be found here.
Project Exercises
Project 18.1
Let's reconsider Project 3.1, the answer to which can be found here. In this project, we bounced a ball around the screen. Make the following changes:
- The "up" and "down" buttons in the project changed the size and speed of the ball, with "up" increasing both and "down" decreasing both. Separate these functions: a single click on these buttons should increase or decrease size of the ball and a long click on these buttons should increase or decrease speed.
- The "select" button was used to restart the ball. Make the select button restart the ball on a double click only.
- Make a long click on the "select" button change the color of the ball. Experiment with how long the long click should be. Make the long click very long: 2 seconds or more.
You can find answer to this project here.
Project 18.2.1
Let's reconsider Project 6.4. The starter code drew concentric circles using a loop; the final project answer converted the loop version to a recursive version.
We are going draw concentric circles with color. If we reverse the loop and draw the circles inside each other, we can get a nice coloration. Here's a rewrite of draw_circles that does this:
static void draw_circles(GContext *ctx) {
  GColor color = GColorBlack;
  graphics_context_set_stroke_color(ctx, GColorBlack);
  for(int radius = screen_width / 2; radius >= 0; radius -= 10) {
    color.argb += 5;
    graphics_context_set_fill_color(ctx, color);
    graphics_fill_circle(ctx, center, radius);
    graphics_draw_circle(ctx, center, radius);
  }
}
Step 1: Alter the code in drawing_layer_update_callback() to log a message before it calls draw_circles(). It should look like this:
static void drawing_layer_update_callback(Layer *me, GContext *ctx) {
  APP_LOG(APP_LOG_LEVEL_INFO, "The drawing layer is updating.");
  draw_circles(ctx);
}
Question #1: Examine the app log to see the logging messages. Count the number of messages. Can you explain why the number of updates occured like they did?
Step 2: Use the function layer_mark_dirty() to mark the drawing layer as dirty and to force a redraw. You can put this call as the last line in drawing_layer_update_callback() or in draw_circles().
Question #2: Go to the app log and count the updates to the layer. Can you explain these results?
Project 18.2.2
The goal of this project is to draw circles by drawing one circle on its own layer and stacking the layers up.
Here's a couple of thoughts:
- We cannot simply replace the code of
draw_circles()with code to create these new layers. This is because the function is a layer update function and redrawing the base layer will calldraw_circles()again, which will create layers all over again. This will repeat and fill up memory unneccessarily. - What will be update callback for these new layers? Each callback will draw one circle on the layer. You will need a new callback.
- How will each layer know what the radius of its circle needs to be? We could compute the radius for each layer, but we would need to know something about where a layer appears in the hierarchy.
Implement a program that maintains a table of layers. Each layer must search for itself in the layer table and use the table position to inform how big a circle to draw.
An implementation of this solution can be found here.
Project 18.3
Find the starter code to Project 18.3 here. It reads through a file of headlines; calling the function get_headline() to get a string with the "next" headline.
You are to write code that declares three text layers. Write the following code:
- Write a function that will display a headline in a text layer, then display the next line after the "select" button is pressed. You will need to create the text layer and add it to the root window as well.
- Write a function that displays the headlines, but while one is displayed, a second text layer is used to display the next headline. Swap these after the "button" is pressed and fill the hidden layer with the next headline. You will need code to create and add this second text layer.
- Write a function that will display a "high priority" text layer. The letters should be in red and the background should be yellow. Make the next headline read from the file be a high priority headline if the "select" button is long pressed. Again you will have to create, configure, and add this layer.
Now, answer some questions about this. Was there any advantage to using two layers? Was there any advantage to using a high priority layer? Would it be just as easy to change the text and colors of one layer?
You can find an answer to this project here.
Project 18.4
This exercise is a bit challenging, mostly because we have not gone over the menu layer in detail.
Find the starter code for Project 18.4 here. It reads a file of headlines (like the previous exercise) but adds a second line as the "article" to be read from the headlines. The function next_headline() will give you a string that represents the next headline from the file. The function get_article() takes an integer and returns a string that represents the article at the position specified by the parameter.
You are implement a menu layer that holds a menu of headlines drawn from the file. When the select button is pressed on a headline, the menu is hidden and the article text is displayed. When the select button is pressed in the article display, the menu is redisplayed. The "back" button will also implement this latter functionality.
Before you implement this, ask some questions. How many windows do you need? What layers should be in those windows? How should your code change the responses to buttons?
You can find information about the menu layer from the barcode example we discussed in this chapter. The documentation on the menu layer can be found here.